Build Robots Create Science
(BRiCS): A hands-on learning initiative from IIT Kanpur
Wall Following Robot Kit
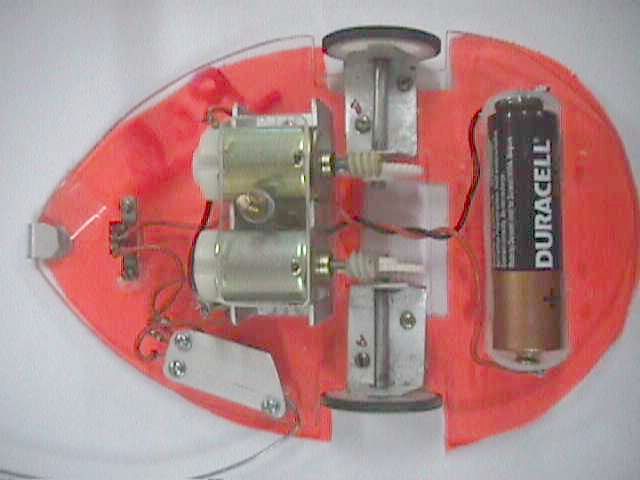
Assembled wall-following robot. Two motors with worm gears drive two
wheels.
A two-way switch (bottom left, whisker coming out of it), connects either the left motor (whisker pressed) or the right (whisker released).
Description
This is a low cost educational robot kit that can follow a wall to its left. If the wall turns left, the robot will turn and keep following it.
Robot at work videos:
 video1
[AVI 1.3MB]
video1
[AVI 1.3MB]  video2 [MOV 2.6MB]
It is made out of commonly available electronic components, tape-deck parts, and raw materials such as plastic sheets.
Components Needed

The set of parts (base etc. made by workshop students)
The kit consists of the following components. You can also find these
in most electronics markets and build your own robot!
- Base (the large plastic piece)
- Small DC Motors - 2 nos (1.5V DC - we prefer the small tape-deck motors)
- Plastic Worm Gears - 2 nos (small pieces that look like screws).
- Plastic Round Gears - 2 nos (circular white pieces with teeth)
- Wheels - 2 nos (we use tape deck pulleys)
- Spring-loaded Two Way Switch - (This you will know by the springy action)
- On/ Off Switch
- Connecting Wires
- Motor Holding plate (flat plate with central hole for heavy screw)
- Wheel shaft holder (Aluminium channel without slots) - 2 nos
- Battery Holder
- Long steel wire for whisker
- 1.5v battery AA
In addition to the above, you will also need some glue for fixing the battery
holder. You will need a cutting tool (e.g. a sharp knife or a hacksaw) and
drilling tools (hand drill with some small drillbits), file, sandpaper,
etc. if you want to work on
the perspex base and change its shape, or add other functionalities.
Circuit Diagram
Can you see in the circuit diagram that only one motor
turns at a time? The two-way switch connects
either the upper blue dot ( right motor ) or the lower dot (left motor). It's
a spring-loaded switch, and when the whisker doesn't press on the spring,
only the right motor is on.
How the circuit works

Student's sketch of the circuit (Goa
Science Center workshop)
The whisker extending out of the two-way switch acts as a
Sensor for the robot. In the circuit diagram this is the
box with the arrow going to either A or B. This part is called a "two-way-switch". It tells the robot when it is near the wall -
such sensors are also known as touch sensors.
Since your whisker is on the Left side, it gets pressed when the
robot moves close to the left wall. Then the switch moves
from the upper blue dot to the lower one. This disconnects the right motor, which stops, and it
completes the circuit for the left motor which starts.
This turns the robot to the right. After some time, the whisker is
no longer in contact with the wall and so it is released. Then again
the right motor turns on and the left motor stops, turning the robot
to the left.
In this way the robot tracks the wall in a zig-zag manner.
Assembling your robot
- Cut the perspex
base to the shape you want, e.g. the figure shows the base for a
mouse-like shape.
- Make big square holes for the Gears in the middle
and the wheels at the side as shown. You will need to mark out
the size of these holes based on the gears you have.
- Drill out holes to fix the motor holder and
and switches. These must be at the right positions to
match the
holes already on the switches.
- Fix the wheel
- Connect the wheels to the shaft and mount
a round Gear at the inside end of each shaft.
- Fix the motors in the motor clamps, mount the worm
gear at the end of the shaft, and then make sure that the
worm is rotating the big gear on the wheel shaft.
[ Note: This is
the most critical step. If the motor is not aligned so that it
drives the wheel-shaft gear, then your robot will not work!]
- Wind one end of the stiff wire tightly around a
thin nail several times. This will be your whisker.
- Fix the whisker on the shaft of the spring on the
two-way switch, so that pressing the whisker operates
the switch. Adjust
the radius of the whisker so it applies the right amount of
pressure on the switch.
- Fix the battery holder
on the base using glue.
- Mount the on-off switch and make the connections using wires according
to the circuit diagram. The wires will need to be twisted into the holes
on the motors and the switches. (If you have someone who can solder these,
it makes a better connection, but soldering is not necessary, just make
sure the ends are twisted tightly in the holes).
- Take some scrap piece of plastic or an aluminium
strip, and bend it over the front of the base so that the
robot is scraping along on this point.
- Insert a 1.5v dc battery in the case and the robot
is ready to move !!!!
Debug
Rarely will your robot work at one go. Debug it as you build it.
For example, after step 5, turn the axle to make sure the wheel turns.
Aftr step 6,
take two wires, and remove the insulation from the ends. Now connect
the battery to the two motor terminals, and see if the wheel turns. Do it for
both motors. Often, the gear may not sit properly below the worm, or the axle shaft may need to be aligned a bit.
Similarly, after putting the whisker, press it and check
for the click sound of the switch.
After step 10, run the motors to make sure the 3-way switch is
working properly. Often, you may find a wire is reversed, or
some other connection is loose.
Remember, perhaps the most important thing you will learn in building this is
not how current flows or how worm-gears work, but that in life, almost
everything needs to be debugged before it works!! It may take a bit of
tweaking, but don't give up, you can do it!
Conducting workshops with the Wall-Following Robot
The wall-following robot kit is appropriate to school children from
class eight on, though we have also used them with younger children.
It is a mistake however to think that they will be able to finish the
robot in an hour or two. Most children in the Indian context are very
hesitant to start playing with wires and motors and batteries, and
typically it takes about 4-6 hours to get most groups to
build the complete kit. Typically the first prototypes are ready
within an hour, but that's when the debugging starts!
If you want to have a more intensive experience, they can also make
the body of the robot, including the base, the motor mounts, the axle mounts,
etc. This would make it a two-day process, and it gives them more
confidence to build their own units later.
Here are some images to show what to expect in workshops.


 Workshops with the wall-following robot a) Vasant Valley,
Delhi; sawing the base (2-day workshop). b) Girl building robot at Goa Science
center. c) Groups building robot at Navodaya Vidyalaya, Sirsaul. [click to enlarge images]
Workshops with the wall-following robot a) Vasant Valley,
Delhi; sawing the base (2-day workshop). b) Girl building robot at Goa Science
center. c) Groups building robot at Navodaya Vidyalaya, Sirsaul. [click to enlarge images]


Workshop at Jaipuria, Kanpur, 2006, with parents.
Students filing for better fit, Nehru Science center, Bombay (2 day workshop).
Once the basic robot is working... Give it character!
Once your basic robot is working, you can try making it more lively.
Decorate your robot by giving it a cover (cut paper
and glue it) - and paint it in the colours of your
favourite animal. If you want you can also add another
shaft on the front which can bob up and down as the
robot moves or you can make many other changes (see elephant idea below).
Idea: Elephant
- Cut out two side views of an elephant on thin card paper. Cut off their
trunks, but keep the long teeth. Paint the sheets grey and black and give
him two nice eyes
- Make a separate piece for the trunk, give it a small hole at the base. Fix
the trunk between the two sheets, with a pin which will act as a hinge (you
can also staple it, and cut off half the staple).
- Cut a small groove in front of the perspex base and put an extra wheel
(or any cylinder) in it. Don't put a rubber rim so it is
low-friction (it will need to slip sideways when you turn).
- Make the axle a bit long (you can use a gems clip), and put a U-bend in it
(this is a crankshaft). Support the other end of the axle on a little
raised cardboard, so the middle can go up and down as it rotates.
- Now connect the middle part of the "U" to the trunk of your
elephant by a thread. Connect it to a point behind the hinge, so the
weight always pulls up your thread.
Note: The nearer you connect the string to the hinge on the trunk, the more pronounced the motion. The tradeoff is that the forces are higher and it
may cut through the cardboard.
- Now as you run the robot, the trunk of the elephant goes up an down!!
Can you make a Giraffe that nods its head? How about a space alien with antennae?
You are limited only by your imagination!
[BRiCS home @
iitk/robotics/] [BRiCS page at iitk.cse/]
Sarala Verma and Amitabha Mukerjee, Center for Robotics and Mechatronics, IIT Kanpur, 2003/2008.